Arduino-Pin Configuration
Now let’s see all the pins in detail. Let’s start with digital pins, they are input/output pins used to send or receive the data from other peripheral devices. Pin0 and pin1 are the RX and TX pins which are used for receiving and transmitting data respectively. Then pin 2 and pin 3 are interrupts. All digital pins give square wave of 0V and 5V. Pins 3, 5, 6, 9, 10, 11 are PWM pin.
RESET:
This pin is used to reset, means it asks processor to restart the execution of program or sketch you uploaded.
AREF:
This is the Analog reference pin using which we can set the highest reference for input range of ADC. Default value is 5V. External Reference that you are providing should not be more than 5V and less than 0V.
PWM:
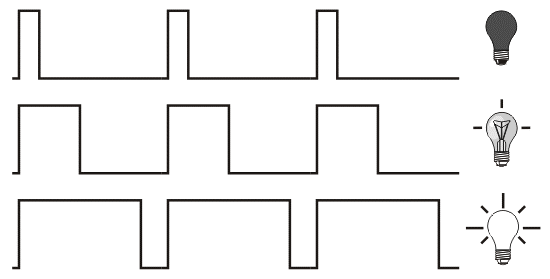
PWM is pulse width modulation, which modulates pulse width and gives the pulse of changed time period. Modulating the pulse width means changing the time for which the output is HIGH and time for which the output is LOW in one pulse cycle of the signal. For example: if you want to change the brightness of a blinking led then you can use the output of PWM pins. Brightness of led changes according to the output voltage of PWM pin. What it does is it converts the 5V power supply to certain number of bits, in case of ATMEGA8 it converts it into 256 bits and assigns 5V to all the bits but 2.5V according to only 128 bits etc. So while using some specific voltage you have to use those many bits. Duty cycle is the terminology which is used in the reference of the PWM signal. Duty cycle is the ratio of the time for which the output is high and time for which the output is low
As you can see in the image below.
Shows 10%, 50%, 90% duty cycle PWM signals, 10% duty cycle means for T/10 seconds output is HIGH.